

How to Add an AI Chatbot to Your WordPress Website
This comprehensive guide will walk you through the entire process from creation to integration of AI chatbot to your WordPress website.
AJ Malik
AJ Malik is a WordPress and AI integration expert, helping businesses automate customer support and boost conversions.
For any business running on WordPress, every visitor interaction is an opportunity. But what happens when those opportunities arise after hours? Unanswered questions lead to lost sales, abandoned forms, and a support queue that drains your most valuable resources: time and energy.
What if you could provide instant, intelligent answers 24/7, guiding users to the right products, content, or services directly on your site?
This is that solution. This comprehensive guide will walk you through the entire process from creation to integration of adding a powerful AI chatbot to your WordPress website. We will use the IntelliChat plugin as our primary example due to its simplicity and deep WooCommerce integration, but the principles here will give you a strategic understanding of any AI integration.
By the end of this guide, you will have a smart assistant live on your site, ready to improve user experience, boost conversions, and automate your customer support.
The Strategic Advantage of an AI Chatbot on WordPress
Integrating an AI chatbot isn't just a new feature; it's a fundamental upgrade to your business operations. Here's the strategic impact:
-
Provide 24/7 Instant Support: An AI never sleeps. It resolves common queries about products, services, or shipping instantly, dramatically improving customer satisfaction and trust.
-
Increase E-commerce Sales: With deep WooCommerce integration, a chatbot acts as a virtual sales assistant. It can offer personalized product recommendations, answer specific pre-purchase questions, and guide shoppers directly to checkout.
-
Generate & Qualify Leads: A chatbot engages passive visitors with targeted questions, collecting contact information and qualifying leads automatically, turning your website traffic into a predictable sales pipeline.
-
Automate Repetitive Tasks: Free yourself from endless FAQs. By training the AI on your site's content, you delegate repetitive queries and reclaim your time to focus on growth.
Client Spotlight: "After adding IntelliChat to our WooCommerce store, we saw a 22% decrease in support emails and a noticeable lift in weekend sales. It's like having a top salesperson working around the clock." – Owner, Artisan Decor Co.
Choosing the Right AI Chatbot Plugin for WordPress
The WordPress ecosystem has several chatbot options. Before we dive into the "how," here's a quick "what" to look for. A great AI chatbot plugin should excel in:
-
Ease of Use: The setup should be simple, with no coding required.
-
Training Method: It must be easy to train the AI on your specific business content, not generic templates.
-
Key Integrations: For stores, WooCommerce integration is a must.
-
Performance: It must be lightweight and not slow down your website.
For this guide, we are using IntelliChat because it scores top marks on all four points, making it an ideal choice for business owners who value power and simplicity.
Part 1: Step-by-Step: Adding Your AI Chatbot from Start to Finish
Before we can add the chatbot to your WordPress site, you need to create, train, and customize it. We've prepared a detailed guide that walks you through this initial setup process from start to finish.
Please click the link below and follow Steps 1 through 6 carefully.
➡️ How to create an IntelliChat chatbot
Once you have completed all six steps and have your chatbot ready, return to this article to continue with the final integration for your WordPress site.
Part 2: Copy Your Project ID
Once your chatbot is created, copy your project ID.
Step 3: Log in to WordPress and Add the Plugin
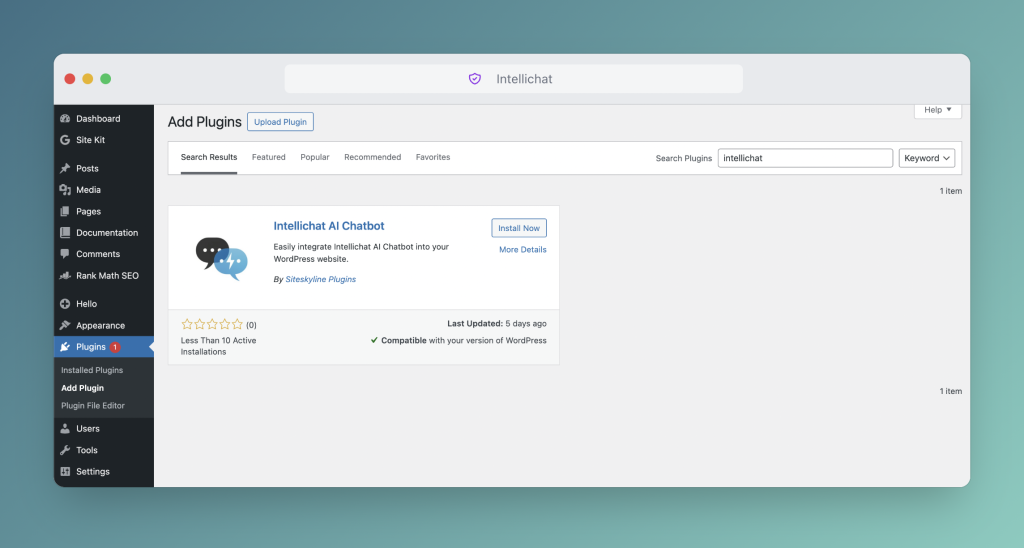
Log in to your WordPress dashboard. Navigate to Plugins > Add New.
Step 4: Search for and Install IntelliChat
In the search bar, type "IntelliChat AI Chatbot" and press Enter. Find the plugin by Siteskyline Plugins and click "Install Now," then click "Activate."
Step 5: Connect Your Chatbot
Once activated, a new menu item will appear. Go to Settings > IntelliChat AI Chatbot in your WordPress dashboard's side menu. You will see a single field asking for your IntelliChat Project ID.
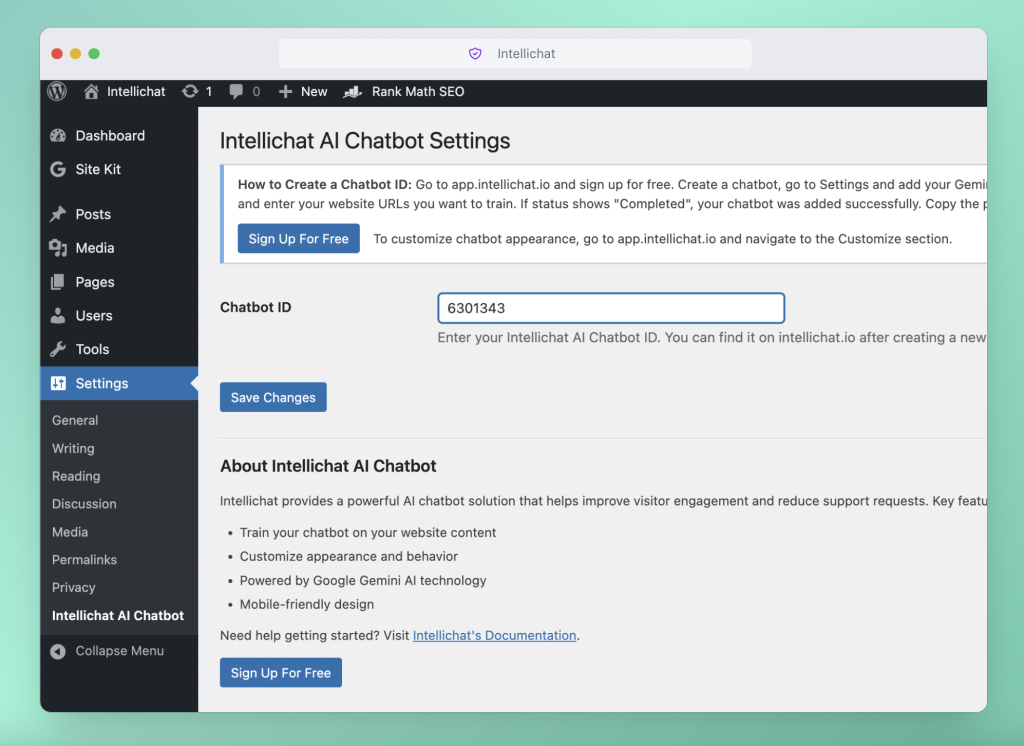
Step 6: Paste Your Project ID and Save
Paste the Project ID you copied in Step 5 into the field and click "Save Changes."
Step 7: Verify on Your Live Site
That's it! Open your website in a new tab. You should now see your customized chatbot icon in the corner, ready to assist your visitors.
Beyond Installation: Best Practices for Success
Your chatbot is live, but the work of optimization has just begun.
-
Review Chat Logs: Regularly check the "Chats" tab in your IntelliChat dashboard to see what questions users are asking. If your bot can't answer something, add that information to its "Sources."
-
Refine Your Welcome Message: Test different welcome messages to see which one encourages the most engagement from visitors.
-
Promote It: Let users know it's there! Add a line in your contact page like, "For instant answers, try our AI assistant in the bottom corner!"
Frequently Asked Questions (FAQ)
1. Is IntelliChat really free to use on WordPress?
Yes, the plugin is free, and the IntelliChat service offers a generous free plan with one chatbot and unlimited chats. To make it fully functional, you need to add your own Gemini API key, which has a substantial free tier from Google suitable for most small businesses. You can get your key from the Google AI Studio.
2. Will the chatbot slow down my WordPress website?
No. The IntelliChat plugin is designed for performance. It loads asynchronously, meaning it loads independently of your website's content. Your page will render completely first, ensuring the chatbot has a negligible impact on your site's performance and Core Web Vitals.
3. How do I make changes to the chatbot after it's live?
All customization is done in your IntelliChat dashboard, not in WordPress. Change colors, welcome messages, or add new training sources, and the changes will automatically sync with the chatbot on your WordPress site instantly.
Final Thoughts: Elevate Your Website Today
Adding an AI chatbot with IntelliChat is one of the highest-impact, lowest-effort upgrades you can make to your WordPress website. It's a fast, code-free, and powerful way to deliver exceptional 24/7 customer support and intelligently guide users toward their goals. You're not just adding a feature; you're building a smarter business.
Ready to transform your user experience?
➡️ Try IntelliChat for Free and Build Your WordPress Chatbot in 5 Minutes